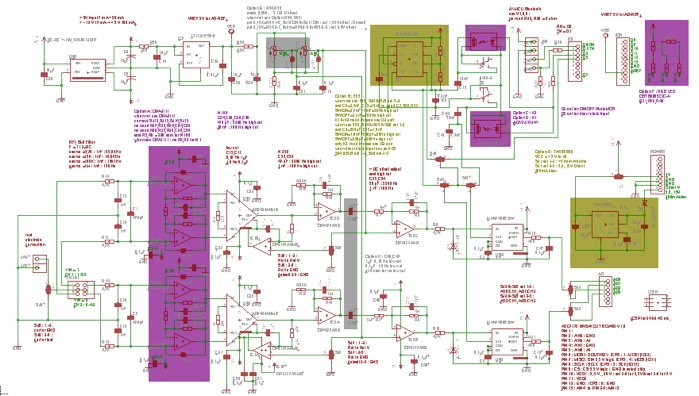
OBWI brain-duino


this PCB can be configure with some option circuit : color rectangle parts are option.
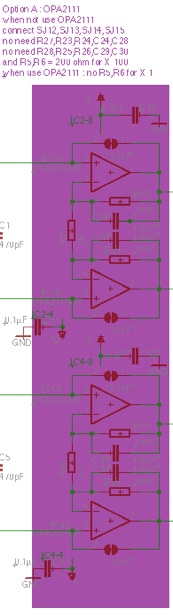
Option A : OPA2111
when not use OPA2111
connect SJ12, SJ13, SJ14, SJ15
no need R27,R23,R24,C24,C28
no need R28,R25,R26,C29,C30
and R5,R6 = 200 ohm for X 100
when use OPA2111 : no R5,R6 for X 1
this option A is included in the Sale unit.
this OPamp is same as used in original IBVA
witch start ship 1991.
one of the most low noise amp in this 30 years.
but need high current ( 5 mA ) to operate this.
with this option
most low noise at all input source impedance.
1 K ohm to 1 M ohm.
with this option
input impedance is 10 T ohm
without this option
input impedance is 200 G ohm
use this option is recommended to use
headset - electrode without cream / jelly
also nice for RFI noise effect.
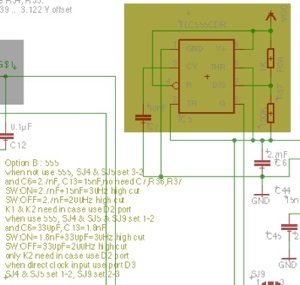
Option B : 555
when not use 555, SJ4 & SJ5 set 3-2
and C6=2.7nF, C13=15nF,no need C7,R36,R37
SW:ON=2.7nF+15nF=30Hz high cut
SW:OFF=2.7nF=200Hz high cut
K1 & K2 need in case use D2 port
when use 555, SJ4 & SJ5 & SJ9 set 1-2
and C6=330pF, C13=1.8nF
SW:ON=1.8nF+330pF=30Hz high cut
SW:OFF=330pF=200Hz high cut
only K2 need in case use D2 port
when direct clock input use port D3
SJ4 & SJ5 set 1-2, SJ9 set 2-3
in case use this CH 1 & CH 2
high cut frequency equal.
in case not use this
around +-10% difference.
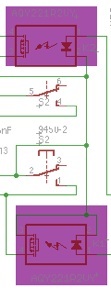
Option C : K2 : AQY221R2VY
Option D : K1 : AQY221R2VY
in case not use this
high cut frequency set by manual SW.
OFF : 200Hz, ON : 30 Hz
use K1 & K2 can control by I/O port D2.
in case use option B, then only K2 need.
need to do Arduino I/O D2 control program.
H is ON, L is OFF.
when use this way need to set manual SW OFF.
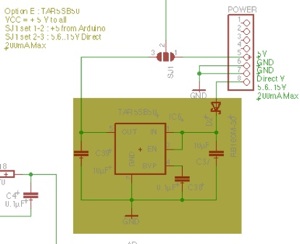
Option E : TAR5SB50
VCC = + 5 V to all
SJ1 set 1-2 : +5 from Arduino
SJ1 set 2-3 : 5.6..15V Direct
200mA Max
use Direct DC input to make 5V
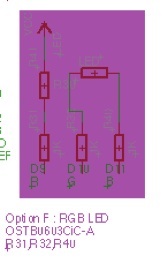
Option F : RGB LED
OSTB0603CiC-A
R31,R32,R40
in case use this RGB LED need to connect
by 3 wire to I/O port
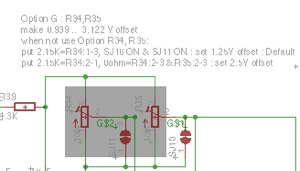
Option G : R34,R35
when not use R34, R35:
2.15K=R34:1-3, SJ10, SJ11 : ON : set 1.25V offset
2.15K=R34:2-1, 0ohm=R34:2-3 & R35:2-3 : set 2.5V offset
when use R34, R35:
make 0.939 .. 3.122 V offset
use this trimmer can set
CH 1 & CH 2 DC offset equal.
without trimmer around +-0.1 V offset may happened to AD 0 .. 5 V input, center 2.5V.
Option H : C46,C47
1µF 0.16 Hz low cut
0.1µF 1.6 Hz low cut
or 0 ohm for no low cut
use this C can eliminate DC offset
easy way.
========= stack 2 board together to make 4 ch input ================
main board : need Bluetooth interface,
SJ2 & SJ3 set 1-2 :
AD0:CH1, AD1:CH2
also need to connect External AD reference Voltage. SJ16 : ON.
stack second board : no need to have Bluetooth interface,
SJ2 & SJ3 set 2-3 :
AD2:CH3(CH1), AD3:CH4(CH2)
also no need to connect External AD reference Voltage. SJ16 : OFF.
Total : 370 mA ( 800 mA Max ) DC input ( 7 .. 12 V ) to Arduino UNO included power for Arduino and Bluetooth.
can not use power from USB connector input. need to use DC plug power input and/or Raw V INPUT PIN.
one board : 150 mA ( 360 mA max ) 5 V
Bluetooth : 30 mA 5 V
Arduino UNO : 40 mA
================ electrode, headset, cable, connector ================
electrode, headset, cable, connector
================ parts list ================
================ Bluetooth interface ================
JY-MCU Bluetooth and Arduino Pro mini setup
=================== for 24 bit AD operation ================
https://github.com/openbrainhacking/AD7173
https://github.com/openbrainhacking/AD7173-Arduino-interrupt-test-with-IBVA
Raspberry pi doesn’t has AD input.
use this ADC7173 BREAKOUT BOARD with SPI connection is one of the way.
=================== use with Spark Core ================
test process:
Spark Core 12 bit AD input is 0 .. 3.3 V.
need to change D1 & D3 5.1 V Zener diode to 3.6 V.
https://github.com/openbrainhacking/spark-testing
=============================================================
question : contact@psychiclab.net

Option parts